Friday, February 10, 2012

Review: American Buffalo

VHS cover image courtesy amazon.com
American Buffalo (1996) ** out of 5 asterisks
Director: Michael Corrente
Starring: Dennis Franz, Dustin Hoffman, Sean Nelson 

The tagline for this movie is "They had a plan. It wasn't worth a nickel."
Sadly, I didn't think this movie was even worth a nickel. It's a very slow, dialog-heavy drama that takes forever to lead anywhere, and the ending it finally leads up to -- after a whole lot of yelling between Dennis Franz and Dustin Hoffman -- is pointless and provides no closure for the conflict created in the story. It just sort of ...ends. 
I'll grant that Franz is solid in his role, and so is Sean Nelson (who was a relative newcomer to the movie biz at the time).

But Hoffman plays a character so annoying and without any redeeming qualities that I just wanted Franz to lose it, tell him to shut up and bash him in the head. With all due respect to an Oscar-winning actor like Hoffman, his performance in this is just a little too much and the director should have dialed him down a bit. Furthermore, the movie was shot like the David Mamet stage play it's based on: three characters and one setting. I don't think that translated too well for the big screen -- it felt like I was watching a stage play.

But there are film critics who loved this, including the late Gene Siskel who gave the film "thumbs up" and called the performances "superb." So
I suppose if you like dialog-driven dramas and are a fan of Mamet's plays as well as Hoffman's or Franz's acting, it's at least worth watching for the banter between Franz and Hoffman. The dialog is certainly well-scripted, but Hoffman's unlikeable character, the slow pace and lack of a satisfying ending ruined the film experience for me.

Monday, January 30, 2012

Aspiring Actors Are Not Actors


I personally hate the term "aspiring actor." You can be a "beginner," but "aspiring"? No. Either you're an actor or you aren't. My definition of "aspiring actor" is someone with no acting experience who wishes they could be an actor -- that they have hopes and dreams of one day becoming an actor.

If you aspire to be an actor, do something about it: take classes and audition for community theater, local stage productions, student projects and indie films. Churches sometimes have drama teams and perform for services and special events, but if your church doesn't have one, start one. If you're in high school or college, get involved with the drama club, or start one if they don't have one. Famous improv troupes got started because friends got together and put on a show. Heck, get a digital video camera and make your own stuff for YouTube or Vimeo, or get together with friends and make something for fun and put it out there for others to see.

There are actors who are famous who aren't very good actors. So don't allow a lack of confidence or inexperience to prevent you from pursuing opportunities to perform. And don't just sit around wishing you could be an actor. Act on it.

Wednesday, December 21, 2011

Shop Smart

No sign of Ash inside, unfortunately.
The manager said he'd been fired for making out
with a Deadite in the stockroom.


Apologies to any who haven't seen Army of Darkness and won't get the joke.
And this is actually no joke -- it's a real gas station in Lexington, SC.

Monday, October 17, 2011

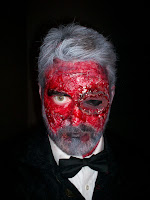
Zombify Yourself!

My name is Bond...
Zombie Bond.

So you want to play undead but you're not sure how to go about it? Well, I can help you look like a zombie without the hassle of dying and coming back from the dead.

First off, I am not an expert, and this is merely a guide to create a basic zombie-like look. As a beginner, you will fail attempting to recreate what you've seen on The Walking Dead or pretty much any zombie movie you've ever watched. But as you practice and experiment, you will discover ways to improve your craft. I had a blast creating my own looks for two haunted house gigs between 2009-10. (And may I add that getting paid to scare people is quite possibly one of the best jobs in the world.)

But before we start, I must give a warning:

WARNING: AVOID GETTING LIQUID LATEX IN EYES, NOSE, MOUTH, ON LIPS OR IN YOUR HAIR, EYEBROWS OR FACIAL HAIR.
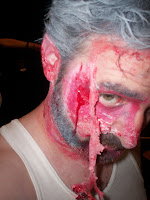
Ouch.
Trust me on this. Liquid Latex bonds like glue. Furthermore, it contains ammonia so the fumes will irritate your eyes and the odor is unpleasant too. It goes without saying that it's not safe to drink, but I went ahead and said it anyway. And don't get it in your hair. Just don't. You can thank me later.

And with that out of the way, let's discuss the stuff you need to turn yourself into a zombie.

TOOLS:

- Bottle/container of Liquid Latex: purchased at your local costume shop or novelty store. Places like Party City (partycity.com) and Spirit Halloween (spirithalloween.com) have shops all over the U.S.
- Halloween face paint: preferably green, gray, black, white, yellow and red. You can mix black and white to create gray tones, or add black or white to darken/lighten other colors.
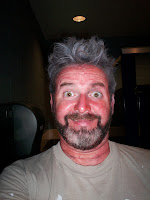
Removing liquid latex is like
giving yourself a chemical peel.
- Tissue paper: one-ply, roll or box.
- Make-up sponges and cotton balls / pads / swabs.
- Fake blood: bottle or tubes. (ANOTHER WARNING: the cheap stuff may turn your skin orange or pink as you can see in the photo to the right. So make sure to read the label and seek advice from knowledgeable employees as to which brand works best.)
- Small paper cups: you pour your Liquid Latex and fake blood into these so it's easier to manage and creates less mess.
- Small electric or battery-operated fan: you can use a small desktop type one, but I prefer the hand-held battery-operated kind. This helps the Liquid Latex dry faster.
- Newspaper, old bedsheets or split-open garbage bag: to stand on and cover the sink and floor with. Creating make-up effects can be messy, especially for beginners. Plan ahead and you won't have regrets later.
- Damp paper towels or rags: you'll need to wipe stuff off your hands/fingers during the zombification process. (And if you use a washcloth or towel, make sure it's a rag and not a decorative or good one. Otherwise someone will not be happy with you. You will never be able to use that washcloth or towel again after this, except as rag.)

Now that you have your tools, get your workspace organized and make sure you have a good-sized mirror and appropriate lighting. (YET ANOTHER WARNING: once Liquid Latex dries, it is not easy to remove. If it drips on your bathroom sink or floor or carpet, be prepared to face the wrath of whomever owns said sink, floor or carpet.)

And make sure your face is freshly washed, and shave any areas where you wish to apply Liquid Latex. This includes women. There are tiny hairs all over your face, neck and ears that I promise you will bond with the Liquid Latex. So the less hair you have on the areas where you're applying latex, the less pain you'll experience later when you have to take the stuff off.

I also advise wearing an old tank top or T-shirt with the collar ripped/cut out while you're applying make-up. That way when you're done, you can just put your zombie clothes on over it. Whatever you're wearing is going to get messy if it's anywhere near your face and hands.

Oh, and you'll want to allow at least an hour for this process. You could do a rush job within 30 minutes, but it's not going to look as good because this process requires layers and Liquid Latex needs time to dry. I'm a perfectionist and after spending two seasons working as a zombie performer, I sometimes spend up to 90 minutes to create a look.

Okay, now you're ready to begin.
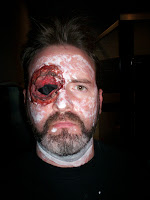
Prosthetic latex piece added for effect.
Don't try this on your first attempt
as it adds another step to the process
and requires the use of Spirit Gum.
STEP 1
Apply first layer of latex on areas of the face where you wish to create texture. HINT: Do one area at a time, rather than spreading it all over your face with the first layer -- forehead, cheeks, nose, ears, chin, neck. And for the love of Jack Pierce, don't get it too close to your eyes.

STEP 2
As you apply latex, tear off pieces of one-ply tissue paper and place over latex while it is still wet.

STEP 3
Let latex and paper dry, then apply a second layer of latex. (You may want to repeat this process 3-4 times -- even adding more tissue paper -- to create more elaborate effects.)

STEP 4
After layers have dried, use your fingers to pinch, pull and stretch the latex and paper to make cuts and rips.
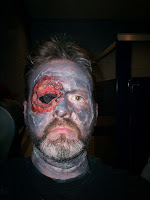
A darker color was used here
as the foundation because
this character needed to look
like he'd been burned to a cris
STEP 5
Select your make-up colors (and premix them if needed), then apply foundation and colors over latex and skin, making sure to blend the edges of the latex, hairline, eyes, mouth, etc.

STEP 6
Add shading. There's no need try to anything fancy as a beginner -- just take your finger and apply black or dark gray make-up around your eyes so it looks sunken-in and zombified. With practice, you can add a little shading your cheekbones, ears, forehead, and around your nose and mouth to create a look of dimension and dilapidation. But if you're going to be playing zombie in the dark, the additional shading is unnecessary. Also during this process, I may add black color to my eyebrows so they stand out more after this next step.
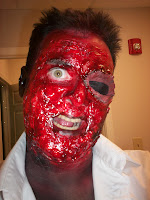
Juicy!
STEP 7
* Add fake blood. You can use a lot or a little depending on the look you want to create. (The look you see to the right was created solely for shock value.) Applying fake blood with a cotton swab will allow you to dab and dribble blood inside the ripped/torn areas of the textured skin you created. In turn, this will leak and trickle down your face like freshly open wounds. For more dramatic effects, pour fake blood straight from the bottle or small cup, but go slowly and start high on the sides of your face or middle of forehead to create bloody trails on your face. And you can use a cotton swab to "guide" the blood as it trickles down your face.

And viola -- 30 to 90 minutes later -- you're a zombie!

* NOTE: Step 7 is more for those who want to look like someone who has just been murdered by zombies and turned into one. To look like a zombie freshly risen from the grave, you'll want to use a gray-yellow-greenish or pale whitish-gray-yellowish color as the foundation, and blood effects should be simpler and limited to shading, bruising, and stippling (by using a textured sponge or crumpled paper towel). You can also use red and black make-up pencils to create a veiny look. After all, the blood is drained from the body before burial and replaced with embalming fluid, so going overboard on the bloody effects may cause you to look amateurish unless you're going for shock value.

If you want to view this as a step-by-step photo process (which includes the images seen here), please click here for a photo gallery of zombie make-up EFX I created for myself. Many images have a caption explaining how the effects were created.
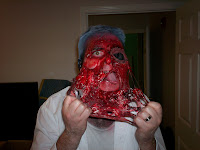
I want his face... OFF!
As for getting this crap off your face later: lather up with a generous amount of liquid soap to remove make-up, fake blood and loosen the latex. As I mentioned earlier, latex bonds to all those tiny hairs on your face, ears and neck, and it hurts like heckfire to pull the stuff off. So peel off the latex slowly, and keep rubbing in soap and water. Some also recommend just taking a shower to get it all off.

Once you've got the latex off, you'll still need to wash again, especially if your skin has been stained by fake blood. I recommend using a good facial scrub -- the kind with that beady, gritty stuff in it -- to remove any residual crud. And if you do happen to get liquid latex in your hair, I was told by BAFTA-nominated movie make-up effects master Francisco X. Perez that peanut butter works wonders to remove it. For other helpful info, visit LiquidLatex.com.

And here's a hint to help create better textures: after you've removed the latex from your face, save it! Let it dry overnight and it shrinks and bonds tightly -- making it look "aged" and deteriorated. This adds a level of realism and shock value you just can't get from a freshly-created latex look. It also then becomes a prosthetic piece you can reuse repeatedly. In the photo you see to the left, I have reused five individual pieces which, on the second use, bonded to form a mask which I was able to reuse 5-6 more times before it became impractical and nasty.

And above all, have fun with it! Be bold! Experiment! Go crazy! That's how legendary movie industry artists like Rick Baker, Howard Berger, Greg Nicotero, Lon Chaney Sr., Jack Pierce, and Dick Smith got their start. (You can learn more about their work on LISTAL.com.) I also recommend watching the STARZ 2008 documentary, Fantastic Flesh: The Art of Make-up EFX (which for you Netflix subscribers is currently available via Instant Watch).


And here's a video tutorial with a process similar to what I have described here:

http://www.youtube.com/watch?v=0uz9XStBJ6k

Source credit: The Fayetteville Feed published an article in their September 2010 issue titled "How To Be Undead," which inspired me to share my experience experimenting with make-up effects. The original article (more like a sidebar in the magazine) was an oversimplified 7-step process which I have modified and expanded by adding specific details. So other than the basic 7 steps involved, these words and images are my own.

Monday, March 7, 2011

Safety First

Another entry in my T-Shirt Design Travesties series:

Now, at first glance there's nothing unusual about this one.
...until you notice the ambulance driver.


Your safety at the Tammany Fair is guaranteed,
thanks to the pelicans driving our ambulances.

* Shirt photographed March 2010 by Craig Crumpton at a thrift store in Norcross, GA.

Thursday, February 3, 2011

A Life Less Extra-Ordinary

Riddle me this...

Question: Name a job where you can work for 8 hours but never actually do any work?

Okay, besides being a politician, cable installer, or construction worker.

Answer: Background extra.

Twice in the last two months I've worked 8-hour days on TV/film shoots but just sat in extras holding the whole time, never to be called to set.

Don't get me wrong -- I'm not complaining. Who wouldn't like getting paid to do nothing?

And both times, I still had a pleasant day getting to make new friends and the meals were good too. So I didn't feel I'd lost anything by being there doing nothing because I still got paid.

But I felt bad for an older gentleman I met on a recent shoot where neither of us were used. It was his first time working as an extra, and he seemed a little bitter that he never made it to set. He said, "I told all my family and friends I was going to be on TV! What am I supposed to say to them now?"

Unfortunately, it happens sometimes. And for anyone interested in working as a background extra, the most important thing to keep in mind (besides always behaving as a professional) is that you should never expect to be on camera. If it happens, great. Call your momma and celebrate. Otherwise, you're setting yourself up for disappointment. I've worked on film shoots that included as many as 300 extras. And in a crowd of 300 extras, do you really think all of them will be seen on camera?

It's called background for a reason. Extras are there simply to provide an element of atmosphere -- a realistic setting for whatever's going on in a scene. Without background, viewers may become aware of how bored they are and realize they are just watching actors blathering at each other. So extras still play a necessary role in production, but on camera they may be out of focus, cropped off at the head or waist, facing away from the camera or merely a silhouette crossing in the distance. And with multiple cameras filming, an extra might be in the frame only for one of them, so there's no guarantee that it will be the shot that the director and editor end up using.

And even if you happen to be close to the cameras while they're rolling, in full focus and everything, you still shouldn't expect to see yourself in the finished product. One of my first experiences working background was on Tyler Perry's The Family That Preys. I was thrilled when I got the call to work on the film because I had heard reports that extras "got good face time" on Tyler Perry's productions. My wife, however, wasn't thrilled about me working on the shoot overnight in downtown Atlanta, but she didn't try to discourage me from something she knew I was really excited about.

The shoot involved a ballroom scene with a few hundred extras, including a full big band orchestra who was hired to not play at all. (Ever try dancing without music or playing an instrument without making noise? Happens on film all the time, and it's a surreal and awkward experience pretending to do so on camera.)

Several times that night I was so close to the camera I could see my reflection on the lens. For one scene, I was placed so close to the principals that I could smell Robin Givens' perfume.

After the film was released, I told lots of family and friends to look for me in the film. And when I finally got a chance to watch it on DVD, I have to say I have never been so excited to see a movie that got mediocre reviews.

So I'm all ready for my big "feature film debut", sitting there on the couch with my wife. And the ballroom scene came and went. It was a lot shorter than I anticipated, and it went by so quick I forgot to really look for myself in the scene. My wife, though, said she didn't see me at all.

So I watched it again.

And...yet again, this time slowing down the frame rate. But I was still nowhere to be seen. By this time, my wife got frustrated with me and went off to play on the internet.

I went through the scene again, frame-by-frame. And finally, I spotted the back of my head in one frame, and my shoulder in another. But it was only because I remembered where I was placed that I knew it was me. My wife didn't believe me at all. "That could be any white guy's head and shoulder," she said frankly.

Which, of course, did nothing to help my ego.

What I discovered, watching the DVD's deleted scenes, was that an entire subplot of the film had been cut, and most of the dialog involving that subplot took place during the ballroom scene.

And that's the way it is for anyone who works background. Heck, even A-List actors' entire scenes have been left on the cutting room floor, so don't think for a moment that your little background contribution might make it in over a cast member's speaking lines. Ultimately, the film is in the hands of the director and the editor, and for an extra it's all in the luck of the edit whether or not you actually appear in the film.

I have since happened to make it on camera occasionally, but that's no longer my motivation for doing background work. I do it for the work and for the experience, and nothing more.

I feel that anyone who enjoys movies and TV shows should work as an extra at least once, just for the experience. My enjoyment comes from being able to see what goes into production. And anyway, it seems wrong to complain about paid work when there are about 15 million unemployed people in America.

And if you get paid to do nothing, accept it and be happy.

Friday, December 17, 2010

Animaniacs Merchandise, Part 2

As promised, here's a follow-up to my previous post showcasing another 5 items from my Animaniacs/Pinky & The Brain merchandise collection:

Item #1 is my most recent addition:
an official Six Flags Wakko Warner ball cap, circa 1997.
Paid $1.71 for it at a thrift store in Winder, GA:


And since I found the Six Flags Pinky hat in October, of course you realize what this means... Now I'll have to track down the others to complete the set. That's what OCD peoples do.

Item #2 is an Animaniacs coffee mug, featuring several
of the series' principal characters:
...Rita & Runt, Buttons & Mindy:


...Pinky & The Brain:


...the Warners -- Yakko, Wakko and Dot, and Slappy Squirrel:


This Warner Bros Studio Store exclusive item is dated 1994,
and my wife found it for $2 at a flea market near Athens, GA.

Item #3 is a decorative piece appropriately-titled "Bad Chemistry"
with P&TB trapped in a lab beaker:


This Warner Bros Studio Store exclusive was manufactured in 1997, and was a gift from my brother Jon (thanks again, Jon!). Designed like a snow globe, the beaker is filled with a water/oil mixture and when you shake it up the water looks like it's boiling. And in a case of art imitating...well, art -- the front even has a visual gag:


- Item #4 is a Pinky & The Brain crystal mug (circa 1999)
-- official Warner Bros Studio Store product
purchased for $6 in 1999 at a WBSS in Memphis, TN:


Buyer's regret: not getting four of these for a complete beverage set.

Item #5 is a Where's Waldo?-type
"Look and Find" (TM) children's book:


This book was published in 1996 through Warner Bros Family Entertainment Reading and Publications International, LTD. It was written by Tom DeMichael, illustrated by the late Jaime Diaz, and the cover was illustrated by Animated Arts.

I should have done a post just on this book, and if it weren't copyright-protected I'd scan the whole thing and post it online for fans who haven't seen it. It's a gem of a collectible. Unlike standard licensed fare for animated properties, those involved in this book seem to have taken great care to make sure it felt like the show too. To write and illustrate a book with details like this has you would simply have to be a fan already. The illustration style is reminiscent of the show's design (especially the DC Comics based on the show), and like the show this book is based on, it's filled with in-jokes, pop culture gags and references to several A!/P&TB episodes.

Just a few examples:

From "Pavlov's Mice":


"Puppet Rulers":


"When Mice Ruled The Earth":


And scattered throughout the book are hidden cameos by politicians (Bill Clinton, George Bush), Looney Tunes characters (Witch Hazel), celebrities (Country stars a-plenty in the "Bubba Bo Bob Brain" double-page spread), and even appearances by Animaniacs characters like The Godpigeon, Buttons, Hip Hippos and of course the Warners (a recurring gag throughout the series is repeated here as well):


And my apologies that I cannot provide better quality images at this time -- print materials don't photograph well with my dated digital camera, and my scanner isn't working.

This book originally retailed for around $10, and I'd recommend it to any fan of the show. You should be able to find a used copy online through amazon.com for around $5 (plus shipping). I found one for $3 at an antique mall in Brasselton, GA back in June 2010. There's also an Animaniacs version which I may cover the next time I feature five more items from my collection.

Thanks for reading!